Post-Construction Cleaning Equipment: The Tools We Bring to Every Toronto Reno

By the Clean Papi team, Toronto. Last updated September 29, 2026.
Quick answer: Post-construction cleaning needs different equipment than a regular clean because construction dust is fine enough to pass through ordinary vacuum filters and float in the air for hours. The core kit is a HEPA-filtered vacuum (99.97% efficient at 0.3 microns), a HEPA air scrubber to pull dust out of the air, and a microfibre system of dust mops and cloths that trap dust instead of spreading it. Around that core, a complete post-construction cleaning equipment list adds a steam cleaner, high-reach poles, window scrapers, non-scratch pads, surface-safe cleaning products and protective gear.
Here is a scene we see every week. A homeowner finishes a kitchen reno in Leslieville. The contractor sweeps, bags the offcuts and heads out. The homeowner grabs the household vacuum, a stack of paper towels and a spray bottle, and spends Saturday cleaning. Sunday morning, there is a fresh grey film on the new quartz. By Tuesday the vacuum smells like it is burning.
Nothing went wrong with the effort. The tools were wrong for the job. Drywall dust, tile dust and sawdust behave differently from household dust, and they beat household tools every time.
We are Clean Papi, a Toronto company offering post-construction cleaning services, plus residential and commercial cleaning, across the GTA. Post-construction cleaning (also called post-renovation cleaning or a builder's clean) is the detailed clean that happens after the trades leave and before you move back in. Our complete guide to post-construction cleaning in Toronto covers cost, timing and the full post-construction cleaning checklist, room by room. This post goes one level deeper: the actual post-renovation cleaning equipment in our crews' kits, what each piece does, why we picked it, and how you can get close to the same result if you are tackling a small job yourself. No brand sponsorships, no fluff. Just the stuff that works.
Post-construction cleaning equipment list: the toolkit at a glance
| Tool | What we use | Why it matters on a reno |
|---|---|---|
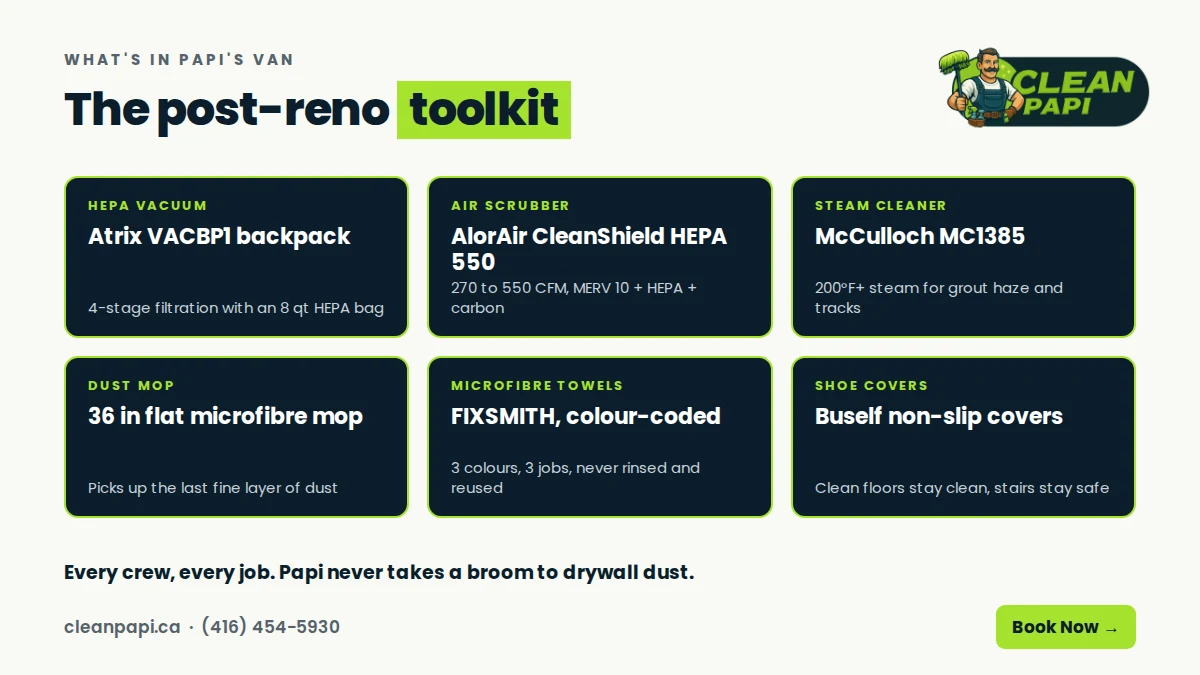
| HEPA vacuum | Atrix VACBP1 HEPA backpack vacuum | Captures fine dust; household vacuums blow it back out the exhaust |
| HEPA air scrubber | AlorAir CleanShield HEPA 550 (270 to 550 CFM) | Removes the dust that is still floating, so it cannot resettle |
| Microfibre dust mop | 36 in flat microfibre dust mop | Traps fine dust on floors; brooms launch it back into the air |
| Microfibre cloths | FIXSMITH microfibre towels, colour-coded | Lifts powder instead of smearing it into a paste |
| Steam cleaner | McCulloch MC1385 canister steamer | Loosens grout haze, residue and packed dust in tracks without harsh chemicals |
| High-reach tools | Extension poles and a step ladder | Dust falls: the top of the room has to be cleaned first |
| Window scrapers and blades | Professional scrapers, fresh blades, lubricant | Paint on windows is on almost every reno |
| Non-scratch pads and brushes | Scrub pads, detail and track brushes | New finishes scratch easily |
| Surface-safe cleaners | pH-neutral, adhesive remover, grout haze remover | Harsh chemicals can etch stone and damage new finishes |
| Protective gear | Buself non-slip disposable shoe covers, respirators, gloves | Keeps the crew safe and the new floors clean |
Why can't regular cleaning tools handle construction dust?
Regular cleaning tools are built for household dust, which is mostly fibres, hair and skin cells: relatively large, light particles that settle fast and get caught by basic filters. Construction dust is ground-up mineral. It is much finer, it stays airborne for hours, and it passes straight through the filters on most household vacuums.
When a drywall crew sands joint compound, they are turning gypsum, calcite, mica and talc into powder. When a tile setter cuts porcelain or a countertop installer trims quartz, they add crystalline silica to the mix. When the carpenters cut trim and flooring, sawdust joins the party. Put all three together and you get a layer of fine grey powder on every surface, plus a cloud of the finest particles still hanging in the air. It is why so many Toronto homeowners end up searching "construction dust allergy symptoms" a week after the contractor leaves: a scratchy throat, itchy eyes and a cough that only shows up at home.
That combination creates three problems ordinary tools cannot solve:
- The dust goes through the filter. A standard vacuum catches the big stuff and exhausts the fine stuff back into the room. You are not removing dust. You are redistributing it at head height.
- The dust is still in the air. Even a perfect surface clean is undone when airborne particles settle an hour later. That is why so many people say "I cleaned yesterday and it's dusty again."
- The dust turns to paste. Wipe drywall dust with a wet paper towel and it smears into a thin white film that dries streaky. Wipe it with a dry cloth and it launches back into the air.
What the health authorities say about cleaning construction dust
This is not just a cleaning company opinion. The Government of Ontario's guidance on silica on construction projects says compressed air or dry sweeping should be avoided when cleaning a work area, and that dust should be removed by damp wiping or HEPA vacuuming. After dusty work, it calls for cleanup by vacuuming with a HEPA-filter-equipped vacuum, wet sweeping or wet shovelling.
Read that again, because it is the whole philosophy of our kit in two lines: no dry sweeping, no blowing, damp wipe or HEPA vacuum only. Every tool below exists to follow that rule.
Household tools vs post-construction tools
| Job | Household tool | What goes wrong | Post-construction tool |
|---|---|---|---|
| Floors | Broom, household vacuum | Dust launched or exhausted into the air | HEPA vacuum, then microfibre dust mop |
| Air | Open a window | Slow, and pushes dust into other rooms | HEPA air scrubber |
| Walls and trim | Paper towel, feather duster | Smears or launches dust | HEPA brush attachment, then damp microfibre |
| Ceilings and fixtures | Step stool and a rag | Missed spots, dust falls on clean surfaces | Extension pole with microfibre head |
| Paint on glass | Fingernail, kitchen knife | Scratches, missed specks | Window scraper with a fresh blade and lubricant |
| Grout haze | All-purpose spray | Haze stays, or acid etches stone | Dedicated grout haze remover, non-scratch pad |
What is a HEPA vacuum, and why do we use one on every post-reno clean?
A HEPA vacuum is a vacuum fitted with a high efficiency particulate air filter, which the U.S. Environmental Protection Agency describes as able to remove at least 99.97% of airborne particles 0.3 microns in size. It is the single most important piece of post-construction cleaning equipment, because a proper drywall dust vacuum is the only way to pick up fine drywall and silica dust without blowing it back into the room.
Why 0.3 microns is the number that matters
The EPA explains that 0.3 microns is the "most penetrating particle size." Particles bigger or smaller than that are actually caught even more efficiently. So a filter rated at 99.97% for 0.3 microns is the worst-case number, and real-world capture of most construction dust is better than that.
For context, a human hair is roughly 50 to 70 microns wide. The dust that makes your throat scratchy after a drywall sand is a tiny fraction of that. A standard vacuum filter lets much of it through. A HEPA filter does not.
Our pick for the best backpack vacuum for drywall dust: the Atrix VACBP1
Our crews wear the Atrix VACBP1 Ergo backpack HEPA vacuum. Per Atrix's spec sheet, it runs four stages of filtration, including an 8-quart HEPA bag, a premotor filter and an exhaust filter. It moves 106 CFM at 1,400 watts, weighs 10.3 lb, and ships with a crevice tool, round brush, floor brush, turbo brush, furniture nozzle and a 22 to 37 in extension wand.
Why a backpack instead of a canister or shop vac? Three reasons:
- It goes where the dust is. Post-reno dust sits on ceilings, crown moulding, stair treads, closet shelves and window tracks. With the vacuum on your back, the hose follows you up a ladder or a staircase instead of a canister bouncing behind you and scuffing new trim.
- Faster room to room. No dragging a machine across new floors, no parking it every few feet. On a three-storey house that adds up to real time saved.
- The dust stays sealed in a bag. The HEPA bag holds the dust inside the machine. When it is full, it comes out closed and goes in the garbage. No dumping an open canister in a customer's driveway.
One rule our crews never break: the VACBP1 can convert to a blower, and on a post-construction job it never does. Blowing construction dust around is exactly what the Ontario silica guidance tells you to avoid.
The honest caveat: HEPA filtration only works if the air actually goes through it. A torn bag, a loose filter or a cracked hose lets dusty air bypass the filters. We check the bag, filters and hose at the start of every job and replace filters on a schedule instead of waiting until they look dirty.
How we use the HEPA vacuum on a job
A HEPA vacuum is not just for floors. On a post-reno clean, it touches almost every surface in the home:
- Ceilings and walls: a soft brush attachment pulls sanding dust off painted surfaces before any damp wipe. This is the step that stops walls from streaking.
- Window and door tracks: the crevice tool gets the packed dust out of sliding door tracks, window channels and the bottom of shower door frames.
- Vents and registers: covers come off, the duct opening gets vacuumed as far as the hose reaches, and the covers get washed.
- Inside cabinets and closets: drywall dust gets behind closed doors. Every shelf, drawer and closet floor gets vacuumed before wiping.
- Baseboards, toe kicks and stair edges: where dust collects and where brooms miss.
- Floors, twice: once in the detail clean and again in the final touch-up after the air settles.
Is drywall dust bad for a regular vacuum?
Yes. A regular household vacuum cannot pick up drywall dust safely, and it will not last long trying. Most household vacuums are not sealed systems, so the finest particles pass through and come out the exhaust. Drywall dust also clogs standard filters fast, and many household vacuum makers warn against using them on drywall dust at all because it can overheat or burn out the motor. If you are cleaning up after a small DIY job, rent or buy a shop vac and add a certified HEPA filter. It costs less than replacing the vacuum you already love.
HEPA vacuum care, the way our crews do it
| Task | How often | Why |
|---|---|---|
| Check the HEPA bag, filters and hose | Start of every job | A tear or gap means dust bypasses the filters |
| Swap the HEPA bag | When about two-thirds full | A full bag cuts suction and strains the motor |
| Remove full bags sealed, straight into a garbage bag | Every swap | Keeps captured dust from escaping back into the home |
| Replace the premotor and exhaust filters | On a schedule, sooner on heavy jobs | Clogged filters lose efficiency and airflow |
| Never use blower mode or compressed air on a job site | Always | Puts fine dust back in the air |
Pro tip for DIYers: wear a mask when you empty the vacuum. The dust you just captured is still the same dust.
What does an air scrubber do during a post-construction clean?
An air scrubber is a portable machine that pulls room air through a series of filters, ending in a HEPA filter, and pushes clean air back out. On a post-construction clean, an air scrubber for drywall dust removes the fine dust still floating in the air, so it gets captured instead of settling back onto surfaces the crew just cleaned.
Think of it this way. The HEPA vacuum and microfibre handle dust that has landed. The air scrubber handles dust that has not landed yet. Skip it, and your crew is racing a slow-motion snowfall all day.
How an air scrubber works
Most commercial units, including ours, use a three-stage filter stack:
- Pre-filter: a coarse filter (MERV 10 on our unit) that catches the bigger stuff, like sawdust and hair. It gets changed often, which protects the expensive filter behind it.
- HEPA filter: captures the finest dust, down to 0.3 microns, the same standard as our vacuums.
- Activated carbon filter: absorbs odours, which helps with the fresh paint, adhesive and new-material smell that hangs around after a reno.
A fan moves a rated volume of air through the stack, measured in cubic feet per minute (CFM). The bigger the room, the more CFM you need.
What we actually use: the AlorAir CleanShield HEPA 550
Our crews run the AlorAir CleanShield HEPA 550. According to AlorAir, it has variable speed from 270 to 550 CFM, the three-stage MERV 10, HEPA and activated carbon filter stack above, an automatic filter change indicator, and ETL certification. It draws just 2.5 amps, so it runs on a regular household outlet alongside our vacuums without tripping breakers. It also has duct connections (16 in intake, 8 in outtake), so it can be set up as a negative air machine when a job calls for it.
Why this unit? It is big enough to clean the air in most Toronto condos and single floors of a house, light enough (about 40 lb) for one person to carry up a flight of stairs, and it stacks in the van.
How big an air scrubber do you need?
Air scrubbers are sized by air changes per hour (ACH): how many times per hour the machine can filter the full volume of air in the space. Restoration equipment maker Legend Brands' guide to air changes per hour says 2 to 4 ACH is normally enough for construction dust control, and gives 6 ACH as a general minimum for an air scrubber. We aim for the higher end on post-reno cleans, because we are actively stirring up dust while we work.
The formula:
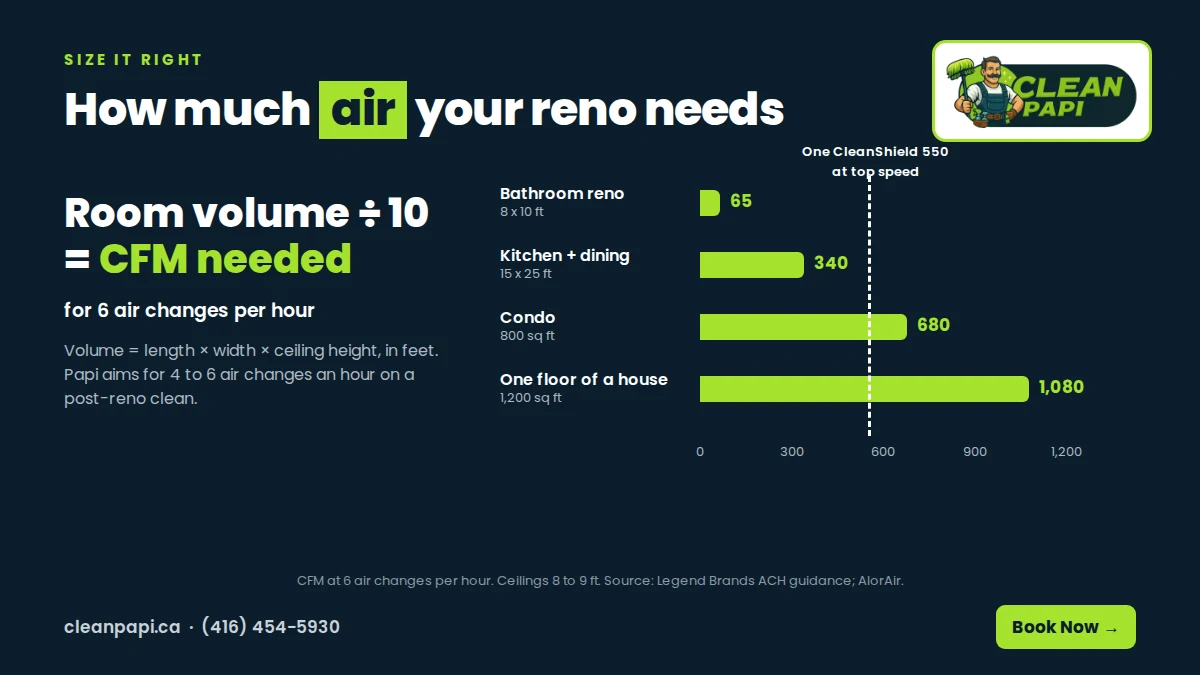
CFM needed = (length × width × ceiling height in feet × target ACH) ÷ 60
At 6 ACH, that simplifies to room volume in cubic feet divided by 10.
| Space | Approx. volume | CFM for 4 ACH | CFM for 6 ACH |
|---|---|---|---|
| Single bathroom reno (8 x 10 ft, 8 ft ceiling) | 640 cu ft | About 45 CFM | About 65 CFM |
| Kitchen and dining area (15 x 25 ft, 9 ft ceiling) | 3,375 cu ft | About 225 CFM | About 340 CFM |
| Toronto condo (800 sq ft, 8.5 ft ceiling) | 6,800 cu ft | About 455 CFM | About 680 CFM |
| One floor of a house (1,200 sq ft, 9 ft ceiling) | 10,800 cu ft | About 720 CFM | About 1,080 CFM |
At its top speed of 550 CFM, one CleanShield covers about 5,500 cubic feet at 6 ACH, or about 8,250 cubic feet at 4 ACH. That is most of a Toronto condo or one floor of a typical semi. On larger homes, we work floor by floor or bring more than one unit. One small machine in a 3,000 sq ft open basement is not doing much beyond making noise.
Where we place the air scrubber
Placement matters as much as size. On most jobs:
- Start it before anyone cleans. Running it for 20 to 30 minutes while the crew sets up clears some of the suspended dust before we stir up more.
- Put it in the dustiest room, away from the door. Usually the kitchen or the room that had the most drywall work.
- Point the exhaust into the room, not at a wall or into a corner, so the air circulates instead of short-circuiting back into the intake.
- Keep doors closed between the work area and finished rooms, so dust does not drift into spaces we already cleaned.
- Leave it running after we finish if the client agrees, then pick it up or schedule the final touch-up the next morning.
Air scrubber vs air purifier: what's the difference?
A household air purifier and a commercial air scrubber both use HEPA filters, but they are built for different jobs. A bedroom air purifier moves a small amount of air and is designed for pollen and pet dander, not a cloud of drywall dust. It will clog in an afternoon. An air scrubber moves several hundred CFM or more, has a pre-filter stack built for heavy loads, and can be set up as negative air on a jobsite, where it exhausts filtered air outside through ducting to keep dust from escaping the work zone. For a post-reno clean in a finished home, we typically run ours recirculating inside the space.
How to get rid of construction dust in the air: the flashlight test
Want to see why air scrubbers matter? Turn off the lights, close the blinds, and shine a phone flashlight sideways across a freshly renovated room. That glittering haze in the beam is dust that has not landed yet. Run a scrubber for an hour and try again.
Why do post-construction cleaners use microfibre dust mops and cloths?
Microfibre traps fine dust instead of pushing it around. Its fibres are split far finer than a human hair and build a static charge as they move across a surface, so drywall dust sticks to the cloth or mop head instead of launching into the air or smearing into paste. On a post-reno clean, a microfibre drywall dust mop and a stack of microfibre towels do most of the surface work after the HEPA vacuum.
How microfibre actually works
The University of Washington's microfibre fact sheet explains it simply: the fibre is split many times smaller than a human hair, and the fibres generate a static electric charge when moved across a surface that attracts dust and contains it. Microfibre can also absorb 7 to 8 times its weight in liquid, which is why a damp microfibre cloth can lift powder without leaving the surface wet.
Compare that to the usual suspects:
- Cotton rags push fine dust around and leave lint behind.
- Paper towels shred, smear drywall dust into paste and cost a fortune on a whole-house job.
- Feather dusters are basically dust launchers.
- Brooms lift the finest particles into the air, which is exactly what Ontario's silica guidance tells you to avoid.
The evidence from hospitals
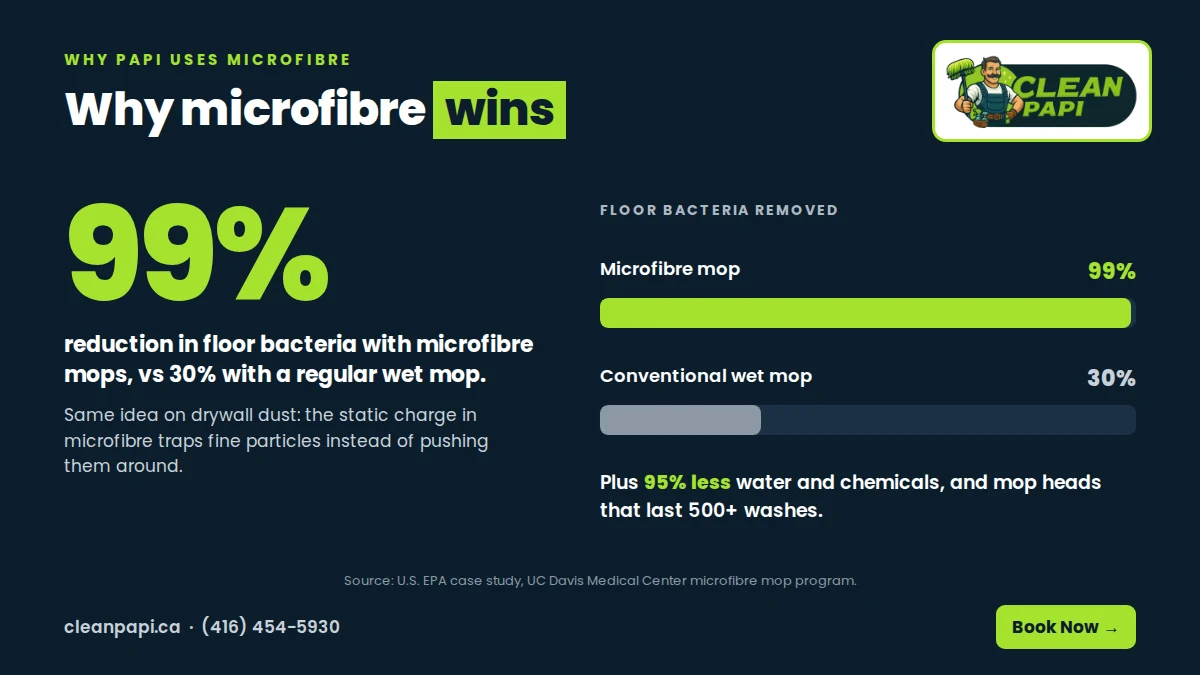
Hospitals care about clean surfaces more than anyone. An EPA case study on microfibre mops at the University of California Davis Medical Center found that microfibre mops cut bacteria on floors by 99%, compared with a 30% reduction for conventional wet loop mops. The same study reported 95% less water and chemical use, and microfibre mops weighing about five pounds less than conventional mops. Bacteria is not drywall dust, but the lesson carries over: microfibre picks up and holds fine material that cotton leaves behind.
The microfibre tools in our kit
| Tool | Where we use it | How we use it |
|---|---|---|
| 36 in flat microfibre dust mop | Hardwood, vinyl plank, tile, concrete | Dry, after HEPA vacuuming, to pick up the last fine layer. The 36 in head covers big open floors fast |
| Same mop with a fresh, barely damp pad | Same floors, final pass | With the right cleaner for the floor type, pads swapped often |
| FIXSMITH microfibre towels | Walls, trim, doors, cabinets, counters | Damp-wiped, folded into quarters, flipped to a clean side often |
| Dedicated glass towels | Windows, mirrors, glass shower doors, stainless | Streak-free final polish, never used on dirty surfaces first |
| Microfibre heads on extension poles | Ceilings, crown moulding, door tops, fans | Top-down dusting before anything else |
We buy FIXSMITH towels in bulk packs of 150 in blue, white and red. That volume is the point: on a whole-house clean we would rather open a fresh towel than rinse a dusty one.
The rules our crews follow with microfibre
- Damp, not wet. A dripping cloth turns drywall dust into paste. A damp one lifts it.
- Fold into quarters. One cloth gives you eight clean faces. When all eight are grey, grab a fresh one.
- Never rinse and reuse a dusty cloth on the same job. Rinsing in a bucket just makes muddy water. We bring a large stack of cloths and bag the dirty ones.
- Colour-code by area. Our towels come in three colours, and each has a job: one for kitchens and general surfaces, one for bathrooms, one for glass and finishing. The towel that did the toilet never touches the counter.
- Top to bottom, back to front. Ceiling first, floors last, and we finish at the exit door so nobody walks across a clean floor.
How to wash microfibre after a construction clean
Microfibre only works if you wash it properly. The UW fact sheet says to use laundry detergent only, not bleach, and to wash microfibre only with other microfibre, because it pulls lint out of cotton. Our crews also skip fabric softener, which coats the fibres and kills the static charge, and shake cloths out outside before washing so a load of drywall dust does not end up in the machine.
What other post-construction cleaning supplies and tools do you need?
Beyond the HEPA vacuum, air scrubber and microfibre, a proper post-construction kit includes high-reach tools, window scrapers, non-scratch scrubbing pads, detail brushes, surface-safe cleaners, protective gear and good lighting. Each one solves a specific renovation mess that the core three cannot.
High-reach tools: extension poles and ladders
Dust falls, so the top of the room gets cleaned first. That means ceilings, pot lights, ceiling fans, crown moulding, the tops of door frames and the tops of kitchen cabinets. We use telescoping extension poles with microfibre heads for most of it, and a sturdy step ladder for detail work on fixtures and high windows. On homes with open-to-above foyers or tall staircases, we plan the ladder setup before the job so nobody is improvising on a stair tread.
How to remove paint from windows without scratching: scrapers and blades
Paint specks on glass are on almost every renovation. So are stickers on new windows, tape residue and the odd splash of drywall mud. Our crews use professional window scrapers with fresh blades, always with a lubricant like soapy water on the glass, held at a low angle and pushed in one direction only. Dragging a blade back and forth over a grain of sand or grit is how glass gets scratched.
A few hard rules:
- Test first on a corner. Some glass has coatings (low-E, tint, self-cleaning) that a blade can damage.
- Never use a blade on natural stone, new hardwood, acrylic tubs, or plastic. Use a plastic scraper or adhesive remover instead.
- Change blades often. A dull or chipped blade scratches.
- Photograph any existing marks first. As we covered in our post-construction guide, old painter's tape can flake and pull paint off frames. Photos protect everyone.
Non-scratch pads and detail brushes
New finishes scratch easily, so our scrubbing tools are chosen to be gentle first:
- Non-scratch scrub pads for grout haze on tile, soap film on new tubs and scuffs on walls.
- Detail brushes (think oversized toothbrushes) for grout lines, faucet bases, cabinet hinges and the corners of shower pans.
- Track brushes for sliding door and window tracks after the HEPA crevice tool pulls out the loose dust.
- Plastic scrapers and putty knives for dried caulk, drywall mud and adhesive on surfaces where a metal blade could do damage.
- Melamine sponges for scuffs and marks on walls and trim, used lightly and tested first because they are mildly abrasive and can dull flat or fresh paint.
Post-construction cleaning products that are safe on new surfaces
The biggest risk on a fresh reno is using the wrong chemical on a new surface. Our crews carry a small, deliberate lineup instead of a cupboard full of sprays:
| Product type | Used on | Avoid on |
|---|---|---|
| pH-neutral cleaner | Almost everything: walls, cabinets, counters, most floors | Nothing major, which is why it is the default |
| Glass cleaner | Windows, mirrors, glass doors | Some stone and wood finishes |
| Adhesive remover | Sticker residue, tape glue, protective film residue | Test on painted and plastic surfaces first |
| Grout haze remover | New porcelain and ceramic tile | Natural stone unless the product says stone-safe |
| Stone-safe cleaner | Marble, granite, quartz, travertine | N/A |
| Hardwood floor cleaner | Site-finished and engineered hardwood | Never soak a wood floor |
| Stainless steel polish | Appliances, hardware, range hoods | Coated or fingerprint-resistant finishes, which usually just need damp microfibre |
Acidic cleaners (vinegar included) can etch marble and damage grout sealer. Bleach does not remove construction dust and can discolour new grout. We read the manufacturer care sheet for new fixtures and flooring whenever the client has it.
Steam cleaner: the McCulloch MC1385
Some renovation messes laugh at a cloth: grout haze, thinset smears, residue baked into window and shower tracks, sticky film on new fixtures. For those, our crews use the McCulloch MC1385 Deluxe Canister Steam Cleaner. Per McCulloch's spec sheet, it heats a 64 oz tank to over 200°F, delivers steam at up to 58 PSI for up to 120 minutes, and comes with 23 accessories, including detail nozzles and brushes.
Where steam earns its place on a post-reno clean:
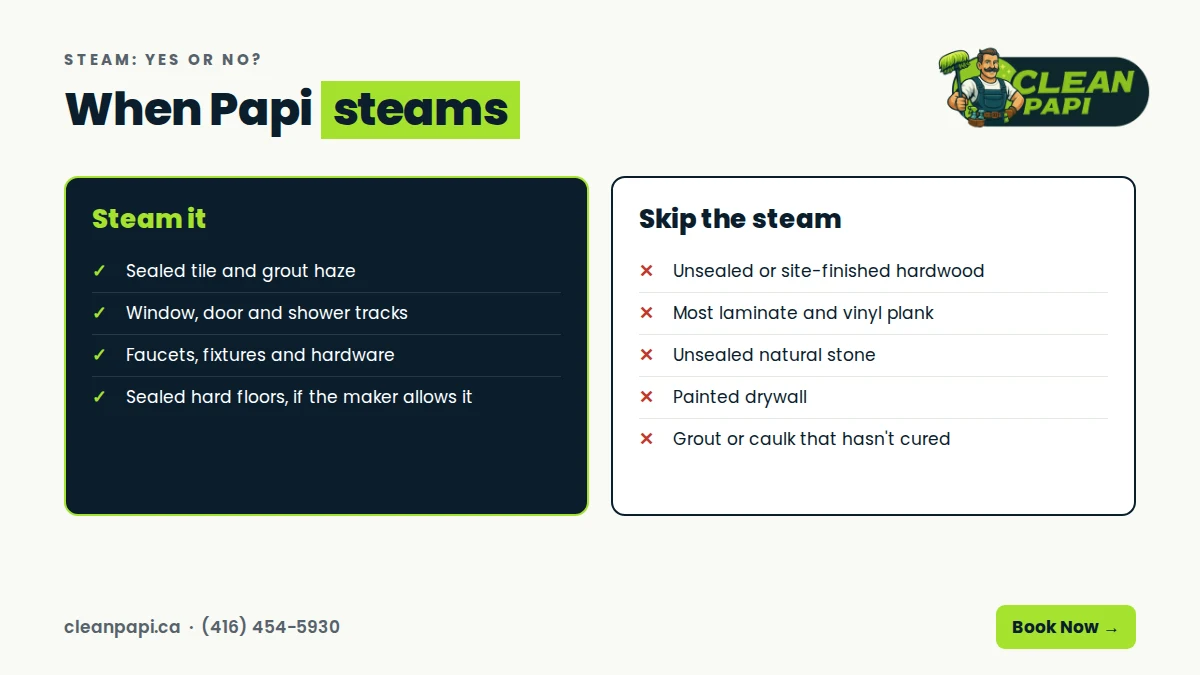
- Tile and grout: loosens grout haze and residue so it wipes away with less scrubbing and less chemical.
- Window, door and shower tracks: blasts out packed dust and gunk after the HEPA vacuum pulls out the loose material.
- Fixtures, faucets and hardware: lifts residue from crevices a cloth cannot reach.
- Sealed hard floors: a final sanitizing pass where the flooring maker allows it.
Where we do not use steam: unsealed or site-finished hardwood, laminate and most vinyl plank (unless the manufacturer says it is steam-safe), unsealed natural stone, painted drywall, and any grout or caulk the installer has not confirmed is fully cured. Heat and moisture can damage all of them. When in doubt, we check the manufacturer's care guide or skip the steamer.
Protective gear
The crew breathes the same dust you do, and we would rather they did not. Our kits include:
- Disposable shoe covers: our crews wear Buself X-Large non-slip covers, so we do not track dust from dirty rooms into clean ones or scuff new floors. The non-slip sole matters on freshly mopped floors and stairs.
- Respirators (N95 or better) for dusty phases, especially when swapping vacuum bags and dusting high surfaces.
- Nitrile gloves for chemical work and scraping.
- Safety glasses for overhead dusting.
The unglamorous extras
These do not make it into Instagram posts, but a crew without them loses an hour a day:
- Bright work lights and a flashlight for the sideways-light test on floors, counters and walls.
- Heavy-duty contractor bags for debris, packaging and dirty cloths.
- Buckets and labelled spray bottles, so nobody guesses which bottle is which.
- Drop cloths to protect finished areas while we work on the next room.
- Extension cords, because renovations have a habit of leaving you one outlet short.
How do you clean after a renovation? The order we use our tools in
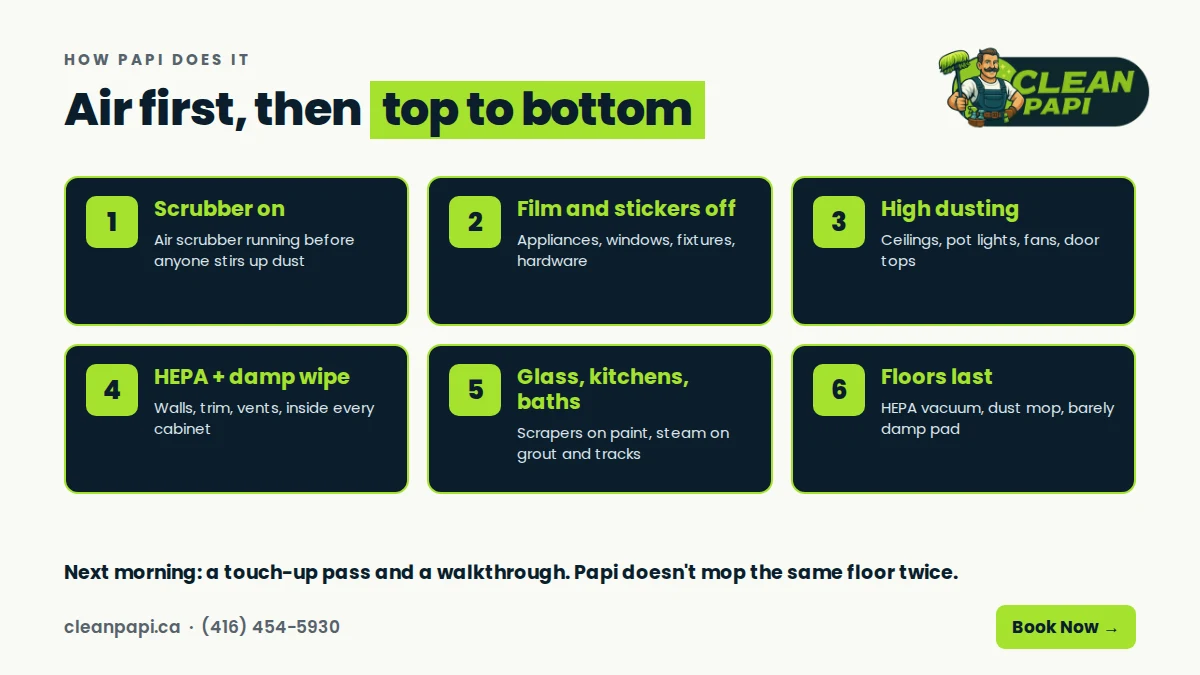
The right order is air first, then top to bottom: start the air scrubber, HEPA-vacuum and dust from the ceiling down, damp-wipe with microfibre, do the detail work with scrapers and pads, then finish floors last with the HEPA vacuum and microfibre mop. The same equipment used in the wrong order means cleaning everything twice.
Here is the sequence our crews follow on every detail clean, room by room. Whether you are doing a deep cleaning after construction yourself or hiring it out, this is how to clean dust after a renovation without doing it twice:
- Walk through and photograph. Before a single tool comes out, we photograph the space, note existing damage like chipped paint or scratched floors, and confirm the scope with the client or contractor.
- Set up the air scrubber. Place it in the dustiest room, turn it on, and let it run while the crew brings in equipment.
- Protect what's finished. Drop cloths over any furniture or areas that are already clean, shoe covers on.
- Remove protective film, stickers and labels. Appliances, windows, fixtures and new cabinet hardware. Adhesive residue gets treated now so it has time to soften.
- High dusting. Extension poles and microfibre heads on ceilings, pot lights, fans, crown moulding, door tops and the tops of upper cabinets.
- HEPA-vacuum walls, vents and ledges. Soft brush on painted walls and trim, crevice tool on tracks and vents.
- Damp-wipe walls, trim, doors and cabinets. Microfibre, folded, flipped often, inside and outside every cabinet and drawer.
- Windows and glass. Scrape paint and residue with a lubricated blade, clean glass, frames, sills and tracks.
- Kitchens and bathrooms. Grout haze, fixtures, appliances, tubs, showers and toilets, with the correct product for each surface. The steamer comes out here for sealed tile, grout, tracks and fixtures.
- Floors. HEPA vacuum first, including edges and corners by hand, then the microfibre dust mop, then a barely damp microfibre wet mop with a floor-appropriate cleaner. Work toward the exit.
- Final touch-up. After the air has settled, often the same evening or next morning, a last pass on horizontal surfaces and floors.
- Walkthrough. With the client or contractor, using the flashlight test on counters and floors.
The one thing clients can do to help: the furnace filter
A furnace or HVAC system that ran during sanding has been pulling construction dust into its filter for weeks. If you do not change it, the system will keep spreading that dust around the house after we leave. Replace the furnace filter after the clean, run the fan for a day, and check it again. It is the cheapest dust control in the house.
What a real job looks like
On a large post-renovation job we quoted recently, a five-bedroom, five-bathroom house with three staircases, about 35 windows with paint spots and between 80 and 120 shelves, the builder had already removed the heavy debris. We scoped it at five cleaners for one full day. That level of detail, counting windows, shelves and staircases, is what lets us bring the right amount of equipment and the right number of people. Too little equipment and a crew of five spends half the day waiting for the one HEPA vacuum.
Post-construction cleaning equipment FAQ
How much does post-construction cleaning cost in Toronto?
Post-construction cleaning prices in Toronto usually run $400 to $800 for a single-room reno in a condo, $800 to $1,500 for a kitchen or full bathroom reno, and $1,500 to $3,500 or more for a whole-home renovation, before HST. Clean Papi's post-construction rate is $60 per labour hour, or $49 per labour hour on large jobs. Builders and multi-unit projects are often priced per square foot, at about $0.30 to $0.50 per sq ft for new construction cleaning. See the full breakdown in our Toronto post-construction cleaning cost guide.
What does post-construction cleaning include?
A post-construction clean includes HEPA vacuuming of every surface, dusting ceilings, fixtures, vents and trim, damp-wiping walls and the inside of every cabinet and closet, removing stickers, film, paint and adhesive, cleaning windows and tracks, deep cleaning kitchens and bathrooms (including grout haze), and a final touch-up after the dust resettles.
What equipment is needed for post-construction cleaning?
The essentials are a HEPA-filtered vacuum, a HEPA air scrubber, microfibre dust mops and cloths, extension poles for high dusting, window scrapers with fresh blades, non-scratch scrub pads, detail brushes, surface-safe cleaners (pH-neutral, glass, adhesive remover, grout haze remover) and protective gear such as respirators, gloves and shoe covers.
Do I really need a HEPA vacuum for drywall dust?
Yes. Drywall dust is fine enough to pass through most household vacuum filters and back into the air, and it can clog or overheat household vacuum motors. A HEPA filter captures at least 99.97% of particles at 0.3 microns, and Ontario's silica guidance recommends HEPA vacuuming or damp wiping instead of dry sweeping.
What is the best vacuum for drywall dust?
A HEPA-filtered vacuum with a sealed bag or canister, enough attachments to reach ceilings, tracks and vents, and a build that handles fine dust. Our crews use the Atrix VACBP1 backpack HEPA vacuum, which has four-stage filtration with an 8-quart HEPA bag and lets the cleaner move up ladders and stairs without dragging a machine across new floors.
Can you steam clean after a renovation?
Yes, on the right surfaces. Steam is excellent for sealed tile, grout haze, window and shower tracks, and fixtures. Do not steam unsealed hardwood, most laminate and vinyl plank, unsealed stone, painted walls, or grout and caulk that has not fully cured. Check the manufacturer's care guide first.
Is drywall dust bad for you?
It can be. NIOSH reports that drywall joint compound dust contains talc, calcite, mica, gypsum and sometimes silica, and can irritate the eyes, nose, throat and airways. Silica dust from tile, stone and concrete is more serious with long-term exposure. That is why we capture dust with HEPA equipment instead of sweeping or blowing it around. If you have ongoing symptoms, talk to your doctor.
How do you clean drywall dust off walls and floors?
For walls: HEPA-vacuum with a soft brush attachment, then damp-wipe with a folded microfibre towel, top to bottom. For floors: HEPA-vacuum first (edges by hand), then a dry microfibre dust mop, then a barely damp microfibre pad with a cleaner made for your floor type. Never dry-sweep, and never mop drywall dust with a soaking-wet mop, or it turns to paste.
How do you get rid of construction dust in your house?
Run a HEPA air scrubber to clean the air, HEPA-vacuum and damp-wipe every surface from the ceiling down, clean inside cabinets and closets, finish floors last, then do a touch-up pass the next day. Replace your furnace filter and run the HVAC fan for a day, because the ducts keep spreading dust until the filter is changed.
How do you clean tiles after a renovation?
HEPA-vacuum the loose dust from the tile and grout lines first, then damp-wipe. Remove grout haze with a grout haze remover and a non-scratch pad, or loosen it with steam on sealed tile. Use a stone-safe product on marble, travertine and other natural stone, since many grout haze removers are acidic and can etch it.
How long should an air scrubber run after construction?
Run it for the whole clean, starting before the crew stirs up dust, and ideally for several hours afterward or overnight. Size it so it can filter the room's full air volume 4 to 6 times an hour. To estimate the CFM you need at 6 air changes per hour, divide the room's volume in cubic feet by 10.
Is an air purifier the same as an air scrubber?
No. Both can use HEPA filters, but a household air purifier moves far less air and is not built for heavy dust loads. An air scrubber moves several hundred CFM or more, has a pre-filter stack to protect the HEPA filter, and can be set up to exhaust outside as negative air.
Why use microfibre instead of paper towels or rags?
Microfibre fibres are split much finer than a human hair and build a static charge that attracts and holds dust. Paper towels and cotton rags push fine dust around, smear it into paste and leave lint. An EPA case study found microfibre mops removed 99% of bacteria from floors compared with 30% for conventional mops.
Should I dry dust or wet wipe after a renovation?
HEPA-vacuum first, then damp-wipe with microfibre. Dry dusting launches fine particles back into the air, and a soaking-wet cloth turns drywall dust into streaky paste. Barely damp is the goal.
How do you get paint off new windows without scratching them?
Use a sharp, clean window scraper on wet, soapy glass, held at a low angle and pushed in one direction only. Test on a corner first, because coated glass can be damaged. Never use a metal blade on natural stone, acrylic or new hardwood.
Can I rent post-construction cleaning equipment in Toronto?
Yes. You can find an air scrubber for rent, along with HEPA vacuums, at equipment and tool rental shops across the GTA. For a single bathroom or closet, renting can make sense. For a full kitchen, basement or whole-home reno, the rental cost plus your weekend often comes close to the price of a professional crew that brings everything.
Post-construction cleaning services in Toronto: why Clean Papi brings its own equipment
The tools are the difference between a renovation that looks clean on Saturday and one that stays clean on Monday. Every Clean Papi post-construction crew arrives with:
- HEPA backpack vacuums (Atrix VACBP1) for every surface, not just floors
- HEPA air scrubbers (AlorAir CleanShield HEPA 550) sized to the space, running from setup to finish
- A full microfibre system: 36 in flat dust mops and bulk colour-coded FIXSMITH towels
- A canister steam cleaner (McCulloch MC1385) for grout, tracks and fixtures
- Professional window tools for paint, stickers and tape residue
- Surface-safe products matched to new tile, stone, hardwood and fixtures
- Non-slip shoe covers on every crew member, every job
- A written dust-removal procedure, so every crew cleans in the same order to the same standard
- Insurance and WSIB clearance, with a COI available for builders, property managers and condo boards
- A walkthrough guarantee: if something is missed, we come back and make it right at no extra charge
Looking for post-construction or post-renovation cleaning near you? Our post-construction cleaning company works across Downtown Toronto (Leslieville, Riverdale, Cabbagetown, Rosedale, The Annex, Liberty Village, King West, Yorkville, The Beaches), North York, Etobicoke, Scarborough, Vaughan, Markham, Richmond Hill, Mississauga and the rest of the GTA.
Book your post-construction clean in Toronto
Renovation done, or a new build ready for its builder's clean? Let us handle the dust. Get an instant estimate or book a walkthrough at cleanpapi.ca/booking, call (416) 454-5930, or see pricing on our post-construction cleaning page. Want the full picture on costs, timelines and the room-by-room checklist? Read our complete guide to post-construction cleaning in Toronto.
Related guides
- Post-construction cleaning cost in Toronto (2026) + checklist
- Post-renovation cleaning in Toronto: the homeowner's guide
- Toronto cleaning cost guide
- Deep cleaning vs regular cleaning
Sources
- U.S. EPA, What is a HEPA filter?
- Government of Ontario, Silica on construction projects: measures and procedures
- NIOSH, Control of Drywall Sanding Dust Exposures
- Atrix, Ergo backpack HEPA vacuum spec sheet
- AlorAir, CleanShield HEPA 550
- McCulloch, MC1385 spec sheet
- Legend Brands, Air changes per hour: what's right?
- University of Washington, Microfiber fact sheet
- U.S. EPA Region 9, Using microfiber mops in hospitals
Related Clean Papi services
Need Professional Help?
Let Toronto's most trusted cleaning team handle the dirty work. Get an instant price estimate — no phone call required.
Related Articles
Move In/Move Out Cleaning for July 1st in Toronto
July 1st moving cleaning in Toronto made easy. Clean Papi handles move in/move out cleaning, deep cleaning, oven scrubs, grout and mold removal so you get your tenant deposit back. Book in 60 seconds.
Services & InfoWasher and Dryer Deep Cleaning in Toronto: The Job That Quietly Prevents House Fires
Clean lint trap, smelly washer, dryer that takes two cycles to finish a load? Here's how Clean Papi deep-cleans Toronto washers and dryers — including the dryer vent that almost burned down an Etobicoke laundry room.
Services & InfoAirbnb Cleaning Toronto: A Host's Guide to Turnovers That Protect Your Superhost Status
Toronto Airbnb host? One missed hair can cost you Superhost status — and a third of your bookings. Here's how Clean Papi runs short-term rental turnovers, and what to ask before you hire any STR cleaner.